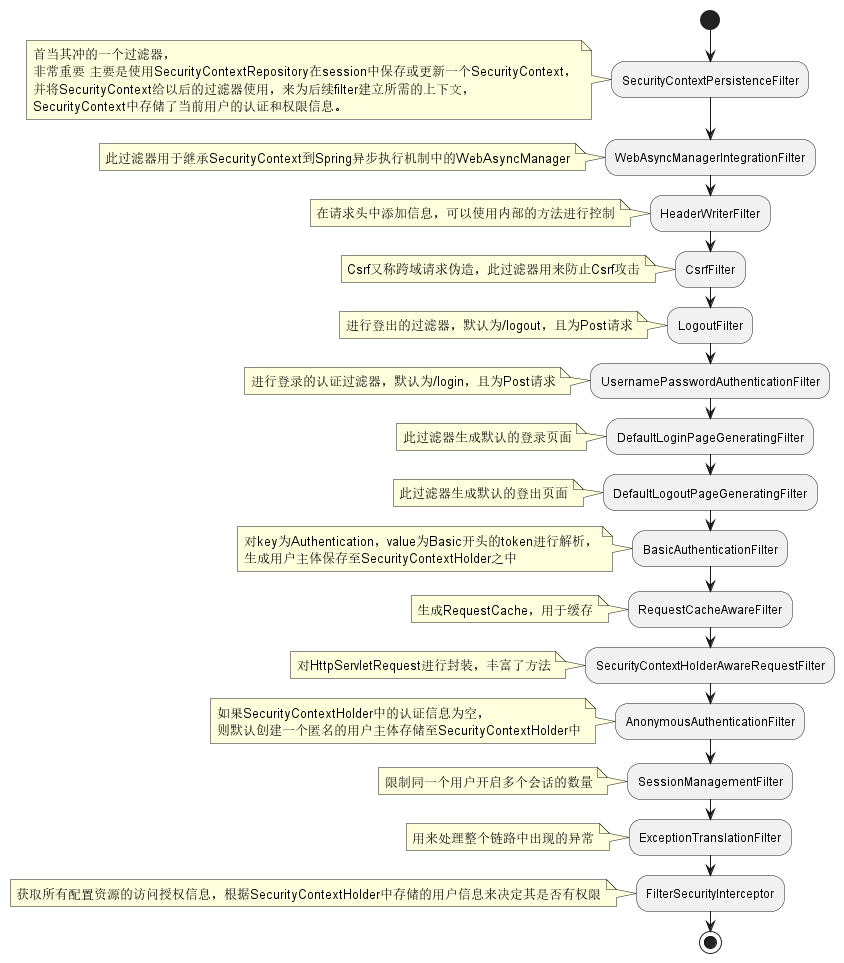
Spring Security入门
一、介绍
Spring Security是一套权限框架,此框架可以帮助我们为项目建立丰富的角色与权限管理。
他的前身是Acegi Security,在以前SpringBoot还未出现的时候,它以繁琐臃肿的配置被人嫌弃。
当 Acegi Security 投入 Spring 怀抱之后,先把这个名字改了,这就是大家所见到的Spring Security了,然后配置也得到了极大的简化。对比同样为权限框架的shiro,相对繁琐的配置依旧让许多开发者望而却步。
直到Springboot出现后,Spring Security重新回到了大众的视野,尤其是SpringCloud出现后,Spring Security的存在感又再次提高。
核心功能:认证和授权
- 认证:authentication
- 介绍:简单说就是你是谁,比如说你是哪个用户,在系统中使用用做登录
- 授权:authorization
- 介绍:简单说就是能干什么,比如说我是管理员,我能删除别人的评论
二、入门使用
创建SpringBoot项目,这里使用的版本为2.4.5,引入相关依赖
1
2
3
4
5
6
7
8
9
10
| <dependencies>
<dependency>
<groupId>org.springframework.boot</groupId>
<artifactId>spring-boot-starter-security</artifactId>
</dependency>
<dependency>
<groupId>org.springframework.boot</groupId>
<artifactId>spring-boot-starter-web</artifactId>
</dependency>
</dependencies>
|
SpringBoot标准启动类就不说了,这里写一个controller
1
2
3
4
5
6
7
8
9
10
11
12
13
14
| package com.banmoon.security.controller;
import org.springframework.web.bind.annotation.GetMapping;
import org.springframework.web.bind.annotation.RestController;
@RestController
public class TestController {
@GetMapping("/hello")
public String hello(){
return "半月无霜,入门spring security";
}
}
|
现在可以启动项目了,记得查看日志

注意看打印的日志,这是系统默认生成的密码
我们请求http://localhost:8080/hello,将会发现跳转到了Spring Security的默认登录页

这是由Spring Security拦截后跳转的页面,我们先进行登录
登录完成后,自动跳转到了/hello页面

除了默认的用户密码,我们还可以指定账号和密码,修改配置文件
1
2
3
4
5
| spring:
security:
user:
name: banmoon
password: 1234
|
再次重新启动,输入自己设置的账号和密码,也能达到同样的效果
三、前后端不分离
1)前端登录页面
Spring Security虽然有登录页面,但默认的实在太丑,我们想要使用自己的登录页面。
前端代码:可以看gitee,相关的后端代码也在

通过服务器的方式去访问,发现http://localhost:8080/login.html页面被拦截

2)配置登录页面
编写SecurityConfig配置类
1
2
3
4
5
6
7
8
9
10
11
12
13
14
15
16
17
18
19
20
21
22
23
24
25
26
27
28
29
30
31
32
33
34
35
36
37
38
39
40
41
42
43
44
45
46
47
48
49
50
51
52
53
54
55
56
57
58
59
| import org.springframework.context.annotation.Bean;
import org.springframework.context.annotation.Configuration;
import org.springframework.security.config.annotation.authentication.builders.AuthenticationManagerBuilder;
import org.springframework.security.config.annotation.web.builders.HttpSecurity;
import org.springframework.security.config.annotation.web.builders.WebSecurity;
import org.springframework.security.config.annotation.web.configuration.WebSecurityConfigurerAdapter;
import org.springframework.security.crypto.password.NoOpPasswordEncoder;
import org.springframework.security.crypto.password.PasswordEncoder;
@Configuration
public class SecurityConfig extends WebSecurityConfigurerAdapter {
@Bean
public PasswordEncoder passwordEncoder(){
return NoOpPasswordEncoder.getInstance();
}
@Override
protected void configure(AuthenticationManagerBuilder auth) throws Exception {
auth.inMemoryAuthentication()
.withUser("banmoon")
.password("1234")
.roles("admin");
}
@Override
public void configure(WebSecurity web) throws Exception {
web.ignoring().antMatchers("/js/**", "/css/**", "/img/**");
}
@Override
protected void configure(HttpSecurity http) throws Exception {
http.authorizeRequests()
.anyRequest().authenticated()
.and()
.formLogin()
.loginPage("/login.html")
.loginProcessingUrl("/login")
.permitAll()
.and()
.csrf().disable();
}
}
|
如此一来,我们再次访问登录页,并输入账号密码
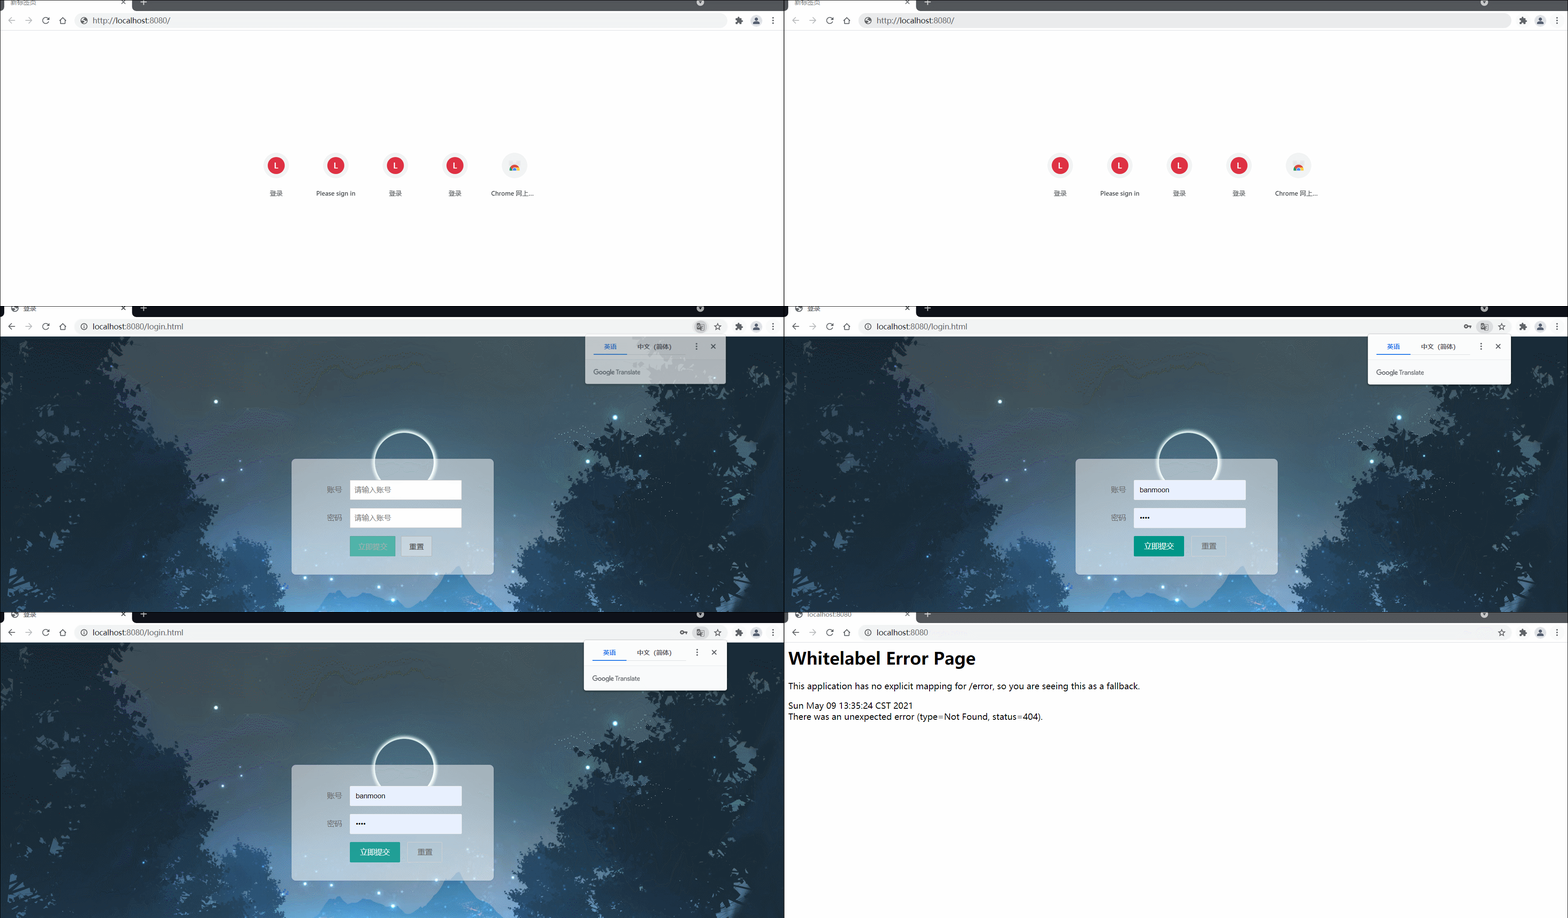
登录成功,但跳转了一个不存在的页面,所以出现了404报错页面
再次修改SecurityConfig配置类,这次我们添加登录后指定跳转的页面
1
2
3
4
5
6
7
8
9
10
11
12
13
14
15
16
17
18
19
20
21
22
| @Configuration
public class SecurityConfig extends WebSecurityConfigurerAdapter {
@Override
protected void configure(HttpSecurity http) throws Exception {
http.authorizeRequests()
.anyRequest().authenticated()
.and()
.formLogin()
.loginPage("/login.html")
.loginProcessingUrl("/login")
.defaultSuccessUrl("/hello")
.permitAll()
.and()
.csrf().disable();
}
}
|

3)配置登出
修改SecurityConfig配置类
1
2
3
4
5
6
7
8
9
10
11
12
13
14
15
16
17
18
19
20
21
22
23
24
25
26
27
28
29
30
31
32
33
| @Configuration
public class SecurityConfig extends WebSecurityConfigurerAdapter {
@Override
protected void configure(HttpSecurity http) throws Exception {
http.authorizeRequests()
.anyRequest().authenticated()
.and()
.formLogin()
.loginPage("/login.html")
.loginProcessingUrl("/login")
.defaultSuccessUrl("/hello")
.permitAll()
.and()
.logout()
.logoutUrl("/logout")
.logoutRequestMatcher(new AntPathRequestMatcher("/logout", "POST"))
.logoutSuccessUrl("/login.html")
.deleteCookies()
.clearAuthentication(true)
.invalidateHttpSession(true)
.permitAll()
.and()
.csrf().disable();
}
}
|
登录成功后,发送post请求登出,页面将回到登录页
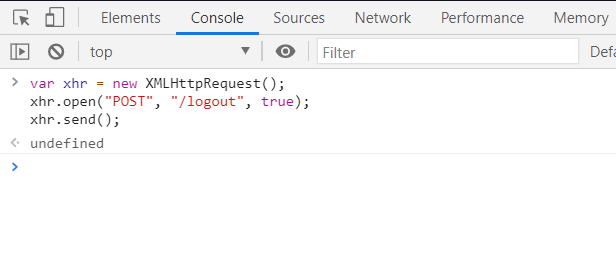
四、前后端分离
在目前的项目环境中,大多数项目都是以前后端分离项目为主,通过json进行交互。
后端不再去控制前端的页面跳转,由前端自己判断后端的状态进行页面的跳转控制。由此来做到前后端的分离。
前端就不再写了,这里要ajax进行请求,推荐使用axios,前端自行判断跳转,我们简单用postman来进行模拟就好
1)配置登录回调
主要使用了successHandler()和failureHandler(),用来处理登录成功以及失败的情况
1
2
3
4
5
6
7
8
9
10
11
12
13
14
15
16
17
18
19
20
21
22
23
24
25
26
27
28
29
30
31
32
33
34
35
36
37
38
39
40
| package com.banmoon.security.config;
import org.springframework.context.annotation.Bean;
import org.springframework.context.annotation.Configuration;
import org.springframework.security.config.annotation.authentication.builders.AuthenticationManagerBuilder;
import org.springframework.security.config.annotation.web.builders.HttpSecurity;
import org.springframework.security.config.annotation.web.builders.WebSecurity;
import org.springframework.security.config.annotation.web.configuration.WebSecurityConfigurerAdapter;
import org.springframework.security.crypto.password.NoOpPasswordEncoder;
import org.springframework.security.crypto.password.PasswordEncoder;
@Configuration
public class SecurityConfig extends WebSecurityConfigurerAdapter {
@Bean
public PasswordEncoder passwordEncoder(){
return NoOpPasswordEncoder.getInstance();
}
@Override
protected void configure(HttpSecurity http) throws Exception {
http.authorizeRequests()
.anyRequest().authenticated()
.and()
.formLogin()
.loginPage("/login.html")
.loginProcessingUrl("/login")
.successHandler(new MySuccessHandler())
.failureHandler(new MyFailureHandler())
.permitAll()
.and()
.csrf().disable();
}
}
|
我们需要一个返回前端统一的DTO
1
2
3
4
5
6
7
8
9
10
11
12
13
14
15
16
17
18
19
20
21
22
23
24
25
26
| package com.banmoon.security.dto;
import lombok.AllArgsConstructor;
import lombok.Data;
import lombok.NoArgsConstructor;
@Data
@NoArgsConstructor
@AllArgsConstructor
public class ResultData<T> {
private Integer errCode;
private String errMsg;
private T data;
public static <T> ResultData success(T data){
return new ResultData(0, "", data);
}
public static ResultData fail(String errMsg){
return new ResultData(-1, errMsg, null);
}
}
|
MySuccessHandler.java,处理登录成功的请求
1
2
3
4
5
6
7
8
9
10
11
12
13
14
15
16
17
18
19
20
21
22
23
24
25
26
27
28
29
30
31
32
33
| package com.banmoon.security.config;
import com.banmoon.security.dto.ResultData;
import com.fasterxml.jackson.databind.ObjectMapper;
import org.springframework.security.core.Authentication;
import org.springframework.security.web.authentication.AuthenticationSuccessHandler;
import javax.servlet.ServletException;
import javax.servlet.http.HttpServletRequest;
import javax.servlet.http.HttpServletResponse;
import java.io.IOException;
import java.io.PrintWriter;
public class MySuccessHandler implements AuthenticationSuccessHandler {
@Override
public void onAuthenticationSuccess(HttpServletRequest request, HttpServletResponse response, Authentication authentication) throws IOException, ServletException {
response.setContentType("application/json;charset=utf-8");
PrintWriter writer = response.getWriter();
writer.write(new ObjectMapper().writeValueAsString(ResultData.success(authentication.getPrincipal())));
writer.flush();
writer.close();
}
}
|
MyFailureHandler.java,用来处理登录失败的请求
1
2
3
4
5
6
7
8
9
10
11
12
13
14
15
16
17
18
19
20
21
22
23
24
25
26
27
28
29
30
31
32
33
34
35
36
37
38
39
40
41
42
43
44
45
| package com.banmoon.security.config;
import com.banmoon.security.dto.ResultData;
import com.fasterxml.jackson.databind.ObjectMapper;
import org.springframework.security.authentication.*;
import org.springframework.security.core.AuthenticationException;
import org.springframework.security.web.authentication.AuthenticationFailureHandler;
import javax.servlet.ServletException;
import javax.servlet.http.HttpServletRequest;
import javax.servlet.http.HttpServletResponse;
import java.io.IOException;
import java.io.PrintWriter;
public class MyFailureHandler implements AuthenticationFailureHandler {
@Override
public void onAuthenticationFailure(HttpServletRequest request, HttpServletResponse response, AuthenticationException e) throws IOException, ServletException {
response.setContentType("application/json;charset=utf-8");
PrintWriter out = response.getWriter();
ResultData result = ResultData.fail(e.getMessage());
if (e instanceof LockedException) {
result.setErrMsg("账户被锁定,请联系管理员!");
} else if (e instanceof CredentialsExpiredException) {
result.setErrMsg("密码过期,请联系管理员!");
} else if (e instanceof AccountExpiredException) {
result.setErrMsg("账户过期,请联系管理员!");
} else if (e instanceof DisabledException) {
result.setErrMsg("账户被禁用,请联系管理员!");
} else if (e instanceof BadCredentialsException) {
result.setErrMsg("用户名或者密码输入错误,请重新输入!");
}
out.write(new ObjectMapper().writeValueAsString(result));
out.flush();
out.close();
}
}
|
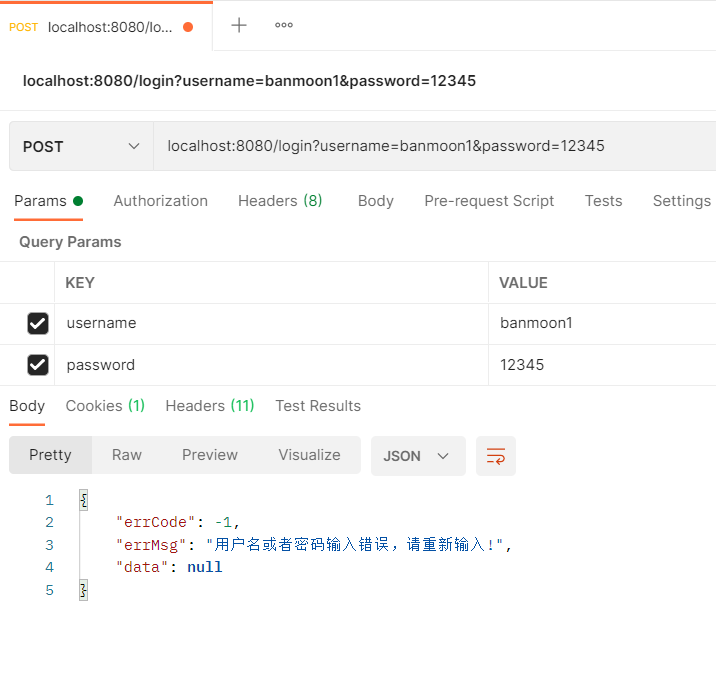
使用postman来进行测试一下,登录成功的回调
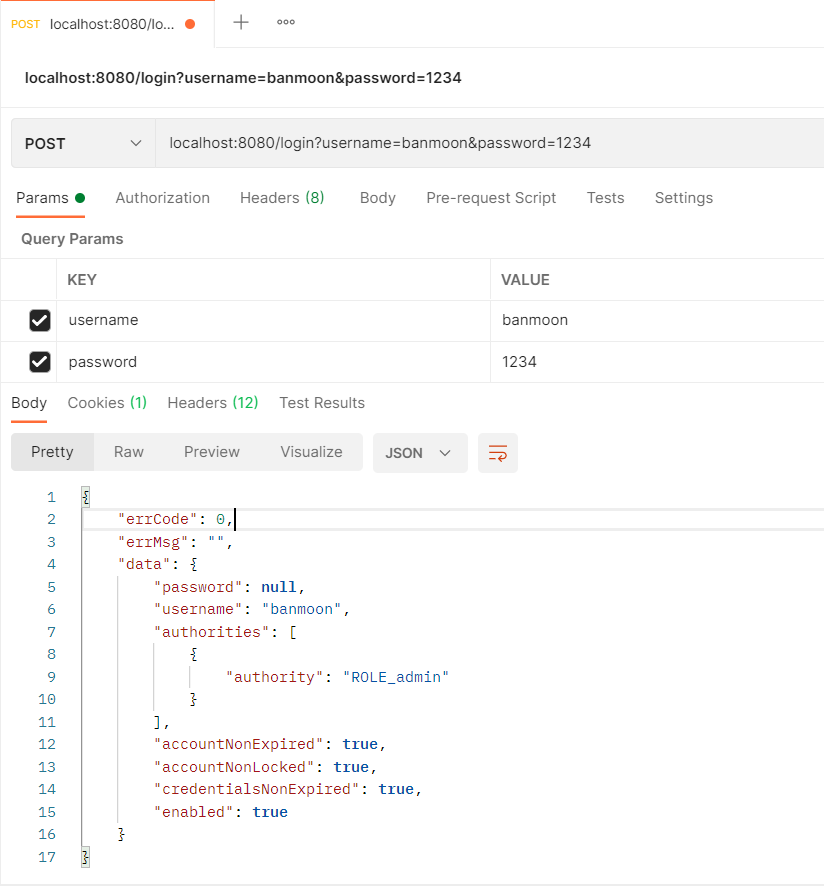
登录失败的回调,我们输错账号或者密码
2)配置登出回调
有登录,就肯定还有登出,我们先建立一个登出的处理类MyLogoutSuccessHandler.java
1
2
3
4
5
6
7
8
9
10
11
12
13
14
15
16
17
18
19
20
21
22
23
24
| package com.banmoon.security.config;
import com.banmoon.security.dto.ResultData;
import com.fasterxml.jackson.databind.ObjectMapper;
import org.springframework.security.core.Authentication;
import org.springframework.security.web.authentication.logout.LogoutSuccessHandler;
import javax.servlet.ServletException;
import javax.servlet.http.HttpServletRequest;
import javax.servlet.http.HttpServletResponse;
import java.io.IOException;
import java.io.PrintWriter;
public class MyLogoutSuccessHandler implements LogoutSuccessHandler {
@Override
public void onLogoutSuccess(HttpServletRequest request, HttpServletResponse response, Authentication authentication) throws IOException, ServletException {
response.setContentType("application/json;charset=utf-8");
PrintWriter writer = response.getWriter();
writer.write(new ObjectMapper().writeValueAsString(ResultData.success("注销成功")));
writer.flush();
writer.close();
}
}
|
然后在配置类中使用这个注销成功处理类
1
2
3
4
5
6
7
8
9
10
11
12
13
14
15
16
17
18
19
20
21
22
23
24
25
26
27
28
29
30
31
32
33
34
35
36
37
38
39
40
41
42
43
44
45
| package com.banmoon.security.config;
import org.springframework.context.annotation.Bean;
import org.springframework.context.annotation.Configuration;
import org.springframework.security.config.annotation.authentication.builders.AuthenticationManagerBuilder;
import org.springframework.security.config.annotation.web.builders.HttpSecurity;
import org.springframework.security.config.annotation.web.builders.WebSecurity;
import org.springframework.security.config.annotation.web.configuration.WebSecurityConfigurerAdapter;
import org.springframework.security.crypto.password.NoOpPasswordEncoder;
import org.springframework.security.crypto.password.PasswordEncoder;
@Configuration
public class SecurityConfig extends WebSecurityConfigurerAdapter {
@Bean
public PasswordEncoder passwordEncoder(){
return NoOpPasswordEncoder.getInstance();
}
@Override
protected void configure(HttpSecurity http) throws Exception {
http.authorizeRequests()
.anyRequest().authenticated()
.and()
.formLogin()
.loginPage("/login.html")
.loginProcessingUrl("/login")
.successHandler(new MySuccessHandler())
.failureHandler(new MyFailureHandler())
.permitAll()
.and()
.logout()
.logoutUrl("/logout")
.logoutSuccessHandler(new MyLogoutSuccessHandler())
.permitAll()
.and()
.csrf().disable();
}
}
|
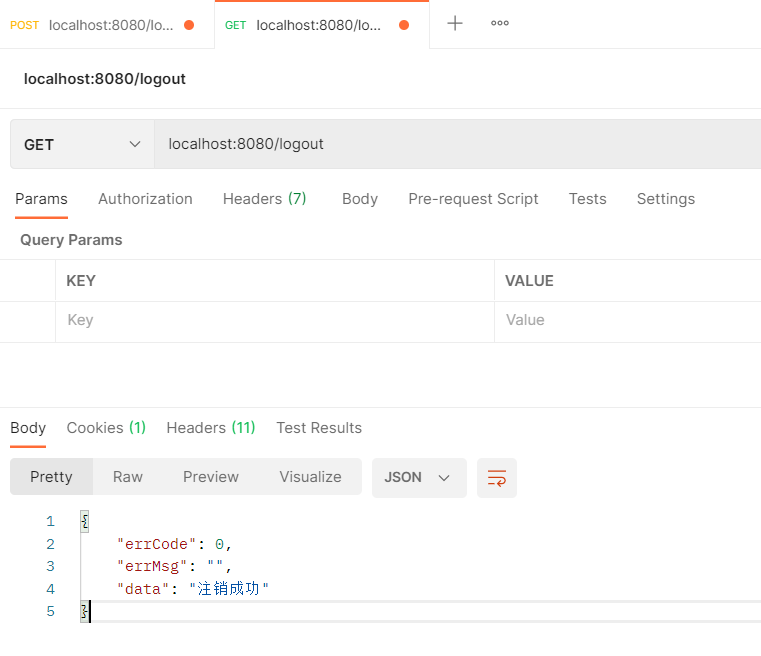
用postman请求登出一下
3)请求失效回调
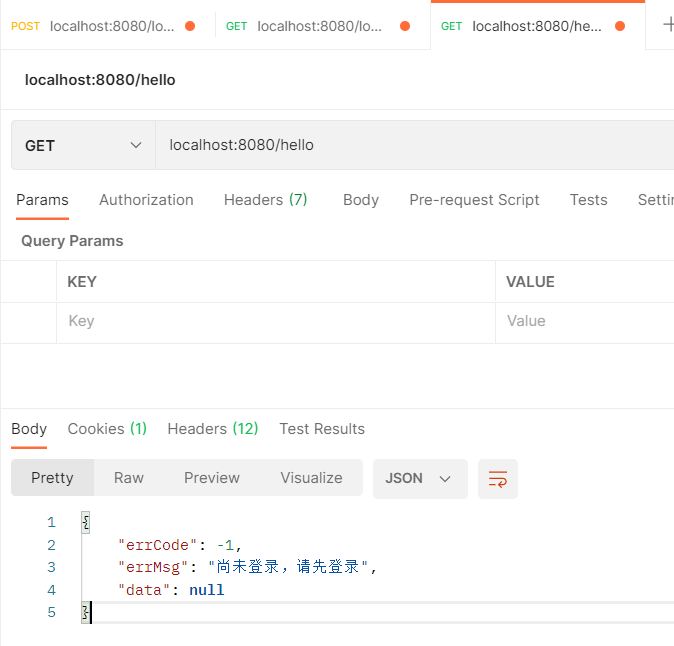
如果一个用户登录时间过期,前一秒还好好的,下一秒就要求进行登录。
这时候我们就需要配置下面这些回调信息,定义一个MyAuthenticationEntryPointHandler.java
1
2
3
4
5
6
7
8
9
10
11
12
13
14
15
16
17
18
19
20
21
22
23
24
| package com.banmoon.security.config;
import com.banmoon.security.dto.ResultData;
import com.fasterxml.jackson.databind.ObjectMapper;
import org.springframework.security.core.AuthenticationException;
import org.springframework.security.web.AuthenticationEntryPoint;
import javax.servlet.ServletException;
import javax.servlet.http.HttpServletRequest;
import javax.servlet.http.HttpServletResponse;
import java.io.IOException;
import java.io.PrintWriter;
public class MyAuthenticationEntryPointHandler implements AuthenticationEntryPoint {
@Override
public void commence(HttpServletRequest request, HttpServletResponse response, AuthenticationException e) throws IOException, ServletException {
response.setContentType("application/json;charset=utf-8");
PrintWriter writer = response.getWriter();
writer.write(new ObjectMapper().writeValueAsString(ResultData.fail("尚未登录,请先登录")));
writer.flush();
writer.close();
}
}
|
在配置类中使用它
1
2
3
4
5
6
7
8
9
10
11
12
13
14
15
16
17
18
19
20
21
22
23
24
25
26
27
28
29
30
31
32
33
34
35
36
37
38
39
40
41
42
43
44
45
46
47
| package com.banmoon.security.config;
import org.springframework.context.annotation.Bean;
import org.springframework.context.annotation.Configuration;
import org.springframework.security.config.annotation.authentication.builders.AuthenticationManagerBuilder;
import org.springframework.security.config.annotation.web.builders.HttpSecurity;
import org.springframework.security.config.annotation.web.builders.WebSecurity;
import org.springframework.security.config.annotation.web.configuration.WebSecurityConfigurerAdapter;
import org.springframework.security.crypto.password.NoOpPasswordEncoder;
import org.springframework.security.crypto.password.PasswordEncoder;
@Configuration
public class SecurityConfig extends WebSecurityConfigurerAdapter {
@Bean
public PasswordEncoder passwordEncoder(){
return NoOpPasswordEncoder.getInstance();
}
@Override
protected void configure(HttpSecurity http) throws Exception {
http.authorizeRequests()
.anyRequest().authenticated()
.and()
.formLogin()
.loginPage("/login.html")
.loginProcessingUrl("/login")
.successHandler(new MySuccessHandler())
.failureHandler(new MyFailureHandler())
.permitAll()
.and()
.logout()
.logoutUrl("/logout")
.logoutSuccessHandler(new MyLogoutSuccessHandler())
.permitAll()
.and()
.csrf().disable()
.exceptionHandling()
.authenticationEntryPoint(new MyAuthenticationEntryPointHandler());
}
}
|
上面那一步就已经登出了,这次我们再进行访问
4)Lambda简化
在上面的三个示例中,一共使用了四个处理类来解决这些回调。
这里提供Lambda表达式的简写方法,可以降低类的数量,仅仅只需要一个SpringSecurityConfig.java配置类就可以解决了
1
2
3
4
5
6
7
8
9
10
11
12
13
14
15
16
17
18
19
20
21
22
23
24
25
26
27
28
29
30
31
32
33
34
35
36
37
38
39
40
41
42
43
44
45
46
47
48
49
50
51
52
53
54
55
56
57
58
59
60
61
62
63
64
65
66
67
68
69
70
71
72
73
74
75
76
77
78
79
80
81
82
83
84
85
86
87
88
89
90
91
92
93
94
95
96
97
98
99
100
101
102
103
104
105
106
107
108
109
110
111
112
| package com.banmoon.security.config;
import com.banmoon.security.dto.ResultData;
import com.fasterxml.jackson.databind.ObjectMapper;
import org.springframework.context.annotation.Bean;
import org.springframework.context.annotation.Configuration;
import org.springframework.security.authentication.*;
import org.springframework.security.config.annotation.authentication.builders.AuthenticationManagerBuilder;
import org.springframework.security.config.annotation.web.builders.HttpSecurity;
import org.springframework.security.config.annotation.web.builders.WebSecurity;
import org.springframework.security.config.annotation.web.configuration.WebSecurityConfigurerAdapter;
import org.springframework.security.crypto.password.NoOpPasswordEncoder;
import org.springframework.security.crypto.password.PasswordEncoder;
import java.io.PrintWriter;
@Configuration
public class SecurityConfig extends WebSecurityConfigurerAdapter {
@Bean
public PasswordEncoder passwordEncoder(){
return NoOpPasswordEncoder.getInstance();
}
@Override
protected void configure(AuthenticationManagerBuilder auth) throws Exception {
auth.inMemoryAuthentication()
.withUser("banmoon")
.password("1234")
.roles("admin");
}
@Override
public void configure(WebSecurity web) throws Exception {
web.ignoring().antMatchers("/js/**", "/css/**", "/img/**");
}
@Override
protected void configure(HttpSecurity http) throws Exception {
http.authorizeRequests()
.anyRequest().authenticated()
.and()
.formLogin()
.loginPage("/login.html")
.loginProcessingUrl("/login")
.successHandler((request, response, authentication) -> {
response.setContentType("application/json;charset=utf-8");
PrintWriter writer = response.getWriter();
writer.write(new ObjectMapper().writeValueAsString(ResultData.success(authentication.getPrincipal())));
writer.flush();
writer.close();
})
.failureHandler((request, response, e) -> {
response.setContentType("application/json;charset=utf-8");
PrintWriter out = response.getWriter();
ResultData result = ResultData.fail(e.getMessage());
if (e instanceof LockedException) {
result.setErrMsg("账户被锁定,请联系管理员!");
} else if (e instanceof CredentialsExpiredException) {
result.setErrMsg("密码过期,请联系管理员!");
} else if (e instanceof AccountExpiredException) {
result.setErrMsg("账户过期,请联系管理员!");
} else if (e instanceof DisabledException) {
result.setErrMsg("账户被禁用,请联系管理员!");
} else if (e instanceof BadCredentialsException) {
result.setErrMsg("用户名或者密码输入错误,请重新输入!");
}
out.write(new ObjectMapper().writeValueAsString(result));
out.flush();
out.close();
})
.permitAll()
.and()
.logout()
.logoutUrl("/logout")
.logoutSuccessHandler((request, response, e) -> {
response.setContentType("application/json;charset=utf-8");
PrintWriter writer = response.getWriter();
writer.write(new ObjectMapper().writeValueAsString(ResultData.success("注销成功")));
writer.flush();
writer.close();
})
.permitAll()
.and()
.csrf().disable()
.exceptionHandling()
.authenticationEntryPoint((request, response, e) -> {
response.setContentType("application/json;charset=utf-8");
PrintWriter writer = response.getWriter();
writer.write(new ObjectMapper().writeValueAsString(ResultData.fail("尚未登录,请先登录")));
writer.flush();
writer.close();
});
}
}
|
这种写法,我是不推荐的,可读性不是很好,代码又多又乱。还不如多写几个类呢。
五、授权
授权授权,顾名思义,用户的级别有所不同,就得给不同级别的用户一个标识。通过这个标识,系统就可以进行判断,这些用户可以做什么,不可以做什么。这一套便是授权
我们简单看下这个TestController.java
1
2
3
4
5
6
7
8
9
10
11
12
13
14
15
16
17
18
19
20
21
22
23
24
25
| package com.banmoon.security.controller;
import org.springframework.web.bind.annotation.GetMapping;
import org.springframework.web.bind.annotation.RestController;
@RestController
public class TestController {
@GetMapping("/hello")
public String hello(){
return "你好,半月无霜,无权限即可访问";
}
@GetMapping("/admin/hello")
public String adminHello(){
return "你好,半月无霜,需要admin权限访问";
}
@GetMapping("/user/hello")
public String userHello(){
return "你好,半月无霜,需要user权限访问,admin也可以";
}
}
|
挺简单的三个请求,要实现下面这个功能
-
/hello是任何人都可以访问,不需要登录就可以访问
-
/admin/hello是只有admin身份的人才可以访问
-
/user/hello是有user或者admin身份的人才可以访问
有了上面这个三个接口,我们简单添加一下用户,已经很熟悉了吧
1
2
3
4
5
6
7
8
9
10
| @Configuration
public class SecurityConfig extends WebSecurityConfigurerAdapter {
@Override
protected void configure(AuthenticationManagerBuilder auth) throws Exception {
auth.inMemoryAuthentication()
.withUser(User.withUsername("banmoon").password("1234").roles("admin").build())
.withUser(User.withUsername("user").password("1234").roles("user").build());
}
}
|
1)简单实现
现在再为请求配置拦截,请求需要的角色权限
1
2
3
4
5
6
7
8
9
10
11
12
13
14
| @Configuration
public class SecurityConfig extends WebSecurityConfigurerAdapter {
@Override
protected void configure(HttpSecurity http) throws Exception {
http.authorizeRequests()
.antMatchers("/hello").permitAll()
.antMatchers("/admin/**").hasRole("admin")
.antMatchers("/user/**").hasRole("admin", "user")
.anyRequest().authenticated();
http.formLogin();
http.httpBasic();
}
}
|
来看看通配符是什么意思吧,看懂了通配符,马上就知道我上面是什么意思了
| 符号 |
说明 |
| ? |
匹配任意单个字符 |
| * |
匹配一层路径 |
| ** |
匹配多层路径 |
通配符很简单是吧,简单测试一下/hello,剩下的就不贴出来了

注意配置请求拦截的坑,一定不能这样写
1
2
3
4
5
6
7
8
9
10
11
12
13
14
| @Configuration
public class SecurityConfig extends WebSecurityConfigurerAdapter {
@Override
protected void configure(HttpSecurity http) throws Exception {
http.authorizeRequests()
.anyRequest().authenticated()
.antMatchers("/hello").permitAll()
.antMatchers("/admin/**").hasRole("admin")
.antMatchers("/user/**").hasAnyRole("admin", "user");
http.formLogin();
http.httpBasic();
}
}
|
然后当你启动的时候,就会发现报错了

截图不全,但没有关系。原因在于Can’t configure antMatchers after anyRequest,不能在anyRequest后配置antMatchers
简单说明下,请求拦截的顺序是和我们配置的顺序一致,所以我们在进行配置时,要从小的请求路径开始配起。
所以,上面的代码就犯了这个错误,一开始就将所有的请求都要进行认证,而下面的/hello却是免认证的,这就导致了冲突。
2)角色继承
在上面的简单使用中,我们是给/user/**配置了hasAnyRole("admin", "user"),也可以达到预定的需求效果。
但是,如果角色之间的关系复杂,有许多角色互相包含的情况下,那么有没有一种简单快捷的方式来进行解决呢,角色继承功能可以解决上面发生的情况,这在实际开发中十分有用
什么是角色继承呢,简单的来说,就是上级角色具有下级角色所有的功能。代码实现如下
1
2
3
4
5
6
7
8
9
10
11
12
13
14
15
16
17
18
19
20
21
| @Configuration
public class SecurityConfig extends WebSecurityConfigurerAdapter {
@Bean
public RoleHierarchy roleHierarchy() {
RoleHierarchyImpl hierarchy = new RoleHierarchyImpl();
hierarchy.setHierarchy("ROLE_admin > ROLE_user");
return hierarchy;
}
@Override
protected void configure(HttpSecurity http) throws Exception {
http.authorizeRequests()
.antMatchers("/hello").permitAll()
.antMatchers("/admin/**").hasRole("admin")
.antMatchers("/user/**").hasRole("user")
.anyRequest().authenticated();
http.formLogin();
http.httpBasic();
}
}
|
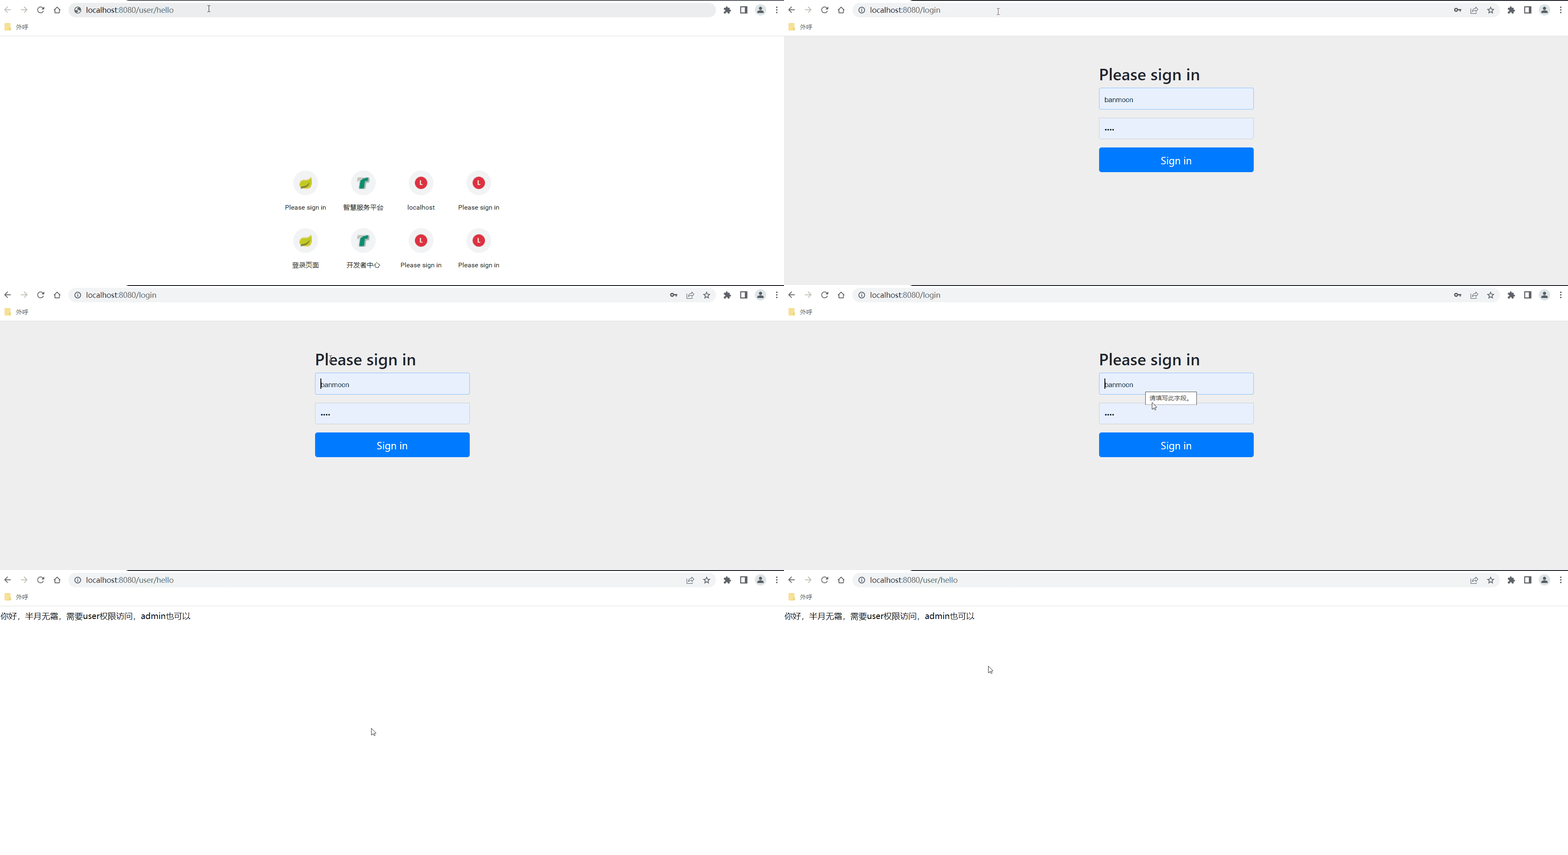
如此一来,我们重启项目,使用admin权限,去访问/user/hello
六、连接数据库
在连接数据库之前,我们先看下UserDetailService.java这个接口以及它的实现类。
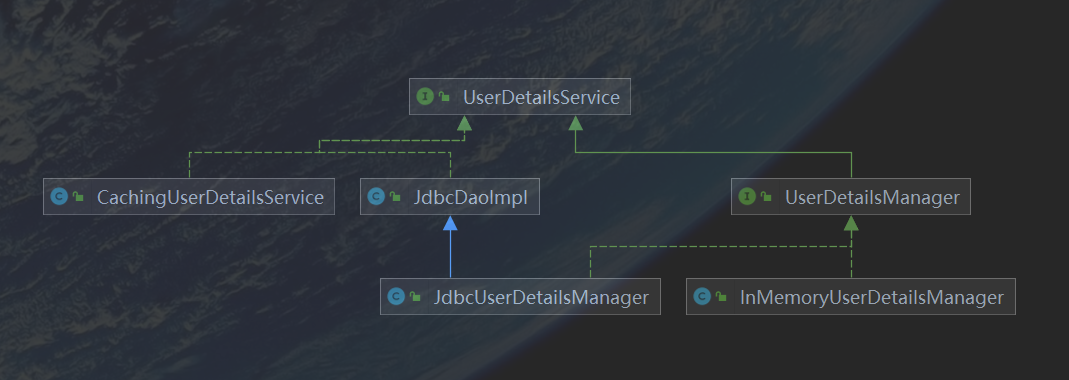
这个接口抽象了一些用户的来源的一些方法,这些用户的来源将在UserDetailService.java的实现类中定义。
眼尖的人已经发现了JdbcUserDetailManager.java,这就是我们将要使用的一个实现类。
1)InMemoryUserDetailsManager
不过在此之前,我们先使用InMemoryUserDetailsManager.java,在内存中设置用户
1
2
3
4
5
6
7
8
9
10
11
12
13
14
15
16
17
18
19
20
| package com.banmoon.security.config;
import org.springframework.context.annotation.Bean;
import org.springframework.context.annotation.Configuration;
import org.springframework.security.config.annotation.web.configuration.WebSecurityConfigurerAdapter;
import org.springframework.security.core.userdetails.User;
import org.springframework.security.core.userdetails.UserDetailsService;
import org.springframework.security.provisioning.InMemoryUserDetailsManager;
@Configuration
public class SecurityConfig extends WebSecurityConfigurerAdapter {
@Bean
public UserDetailsService userDetailsService(){
InMemoryUserDetailsManager manager = new InMemoryUserDetailsManager();
manager.createUser(User.withUsername("banmoon").password("1234").roles("admin").build());
return manager;
}
}
|
就这么简简单单的定义了个Bean,就完成了在内存中对用户的添加。
2)JdbcUserDetailManager
这一次,我们要进行连接数据库啦,记得添加上相关的Maven依赖,以及在配置文件中加上对应的数据源信息
1
2
3
4
5
6
7
8
9
10
11
| <dependencies>
<dependency>
<groupId>org.springframework.boot</groupId>
<artifactId>spring-boot-starter-jdbc</artifactId>
</dependency>
<dependency>
<groupId>mysql</groupId>
<artifactId>mysql-connector-java</artifactId>
<scope>runtime</scope>
</dependency>
</dependencies>
|
1
2
3
4
5
6
| spring:
datasource:
driver-class-name: com.mysql.cj.jdbc.Driver
url: jdbc:mysql://localhost:3306/test?serverTimezone=Asia/Shanghai&allowMultiQueries=true
username: root
password: 1234
|
还有建表语句,我们使用SpringSecurity默认提供的用户sql来进行测试。
默认的sql是针对支持HSQLDB的,修改后的sql如下
1
2
3
4
5
6
7
8
9
10
11
12
13
14
15
16
| CREATE TABLE users (
username varchar(50) NOT NULL PRIMARY KEY,
password varchar(500) NOT NULL,
enabled boolean NOT NULL
);
CREATE TABLE authorities (
username varchar(50) NOT NULL,
authority varchar(50) NOT NULL,
CONSTRAINT fk_authorities_users FOREIGN KEY ( username ) REFERENCES users ( username )
);
CREATE UNIQUE INDEX ix_auth_username ON authorities ( username, authority );
INSERT INTO `users`(`username`, `password`, `enabled`) VALUES ('banmoon', '1234', 1);
INSERT INTO `users`(`username`, `password`, `enabled`) VALUES ('user', '1234', 1);
INSERT INTO `authorities`(`username`, `authority`) VALUES ('banmoon', 'admin');
INSERT INTO `authorities`(`username`, `authority`) VALUES ('user', 'user');
|
但我在官网上没有找到sql的位置5555,但从源码也能看到一些端倪的,定义了相关的一些增删改查的sql
请务必进去看看源码,JdbcUserDetailManager.java
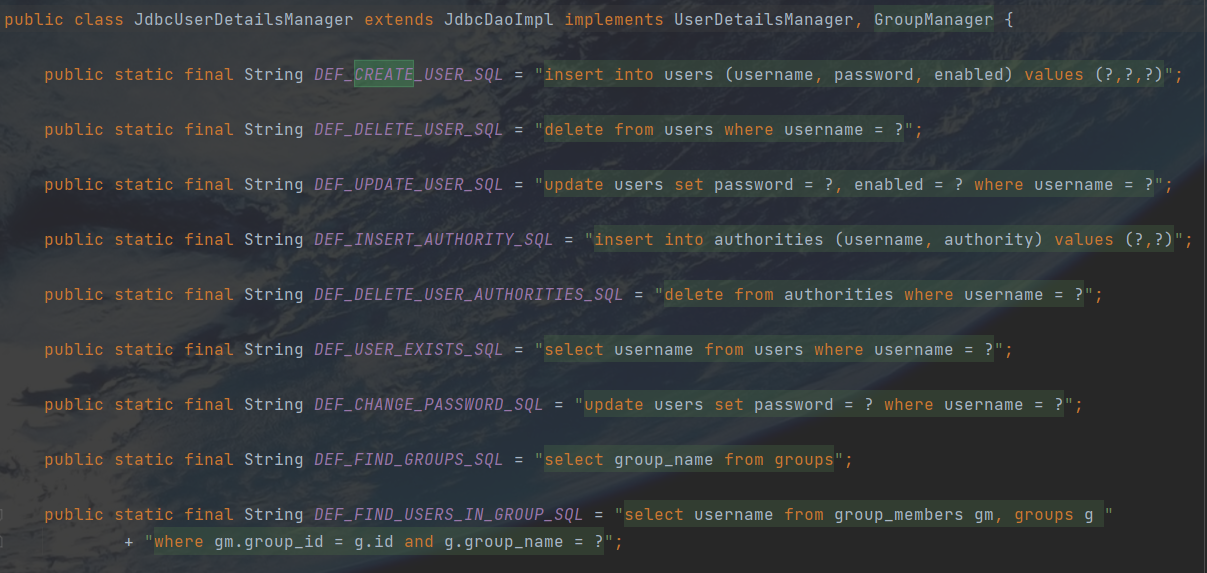
好的,准备工作完成,如何使用这个JdbcUserDetailManager.java呢?其实也很简单,和上面一样,将它定义成Bean即可。
1
2
3
4
5
6
7
8
9
10
11
12
13
14
15
16
17
18
19
20
21
22
23
24
25
26
27
28
| package com.banmoon.security.config;
import org.springframework.beans.factory.annotation.Autowired;
import org.springframework.context.annotation.Bean;
import org.springframework.context.annotation.Configuration;
import org.springframework.security.config.annotation.web.configuration.WebSecurityConfigurerAdapter;
import org.springframework.security.core.userdetails.UserDetailsService;
import org.springframework.security.crypto.password.NoOpPasswordEncoder;
import org.springframework.security.crypto.password.PasswordEncoder;
import org.springframework.security.provisioning.JdbcUserDetailsManager;
import javax.sql.DataSource;
@Configuration
public class SecurityConfig extends WebSecurityConfigurerAdapter {
@Autowired
private DataSource dataSource;
@Bean
protected UserDetailsService userDetailsService() {
JdbcUserDetailsManager manager = new JdbcUserDetailsManager();
manager.setDataSource(dataSource);
return manager;
}
}
|
我们再去访问/hello,被拦截要进行登录,这是正常的,主要是我们要输入账号密码,填入我们在数据库中保存的账号密码,访问成功。
图就不再贴出来了,代码自己测试一下就马上清楚了。
3)自定义实现类
在上面的两个实现类中,一个是在内存中管理的账号密码,一个是数据库管理的账号密码,只是这个类实现管理的账号密码管理功能不是我们想要的。
我们自己的用户表,自己的角色表该如何接入SpringSecurity呢?这时候,我们就得自己去实现UserDetailsService.java接口完成我们自己的功能。
在平常的项目中,我们常常会使用ORM框架来进行开发,这里使用的是MyBatis-plus,没有用过的快去官网补课啦。
首先我们添加MyBatis-plus和MySQL的Maven依赖,同样记得要在配置文件中添加数据源
1
2
3
4
5
6
7
8
9
10
11
12
13
14
15
16
17
18
19
20
21
22
23
24
25
| <dependencies>
<dependency>
<groupId>mysql</groupId>
<artifactId>mysql-connector-java</artifactId>
<scope>runtime</scope>
</dependency>
<dependency>
<groupId>com.baomidou</groupId>
<artifactId>mybatis-plus-boot-starter</artifactId>
<version>3.5.1</version>
</dependency>
<dependency>
<groupId>org.projectlombok</groupId>
<artifactId>lombok</artifactId>
</dependency>
<dependency>
<groupId>junit</groupId>
<artifactId>junit</artifactId>
<scope>test</scope>
</dependency>
</dependencies>
|
1
2
3
4
5
6
7
8
9
10
11
12
13
14
15
16
17
18
19
| spring:
datasource:
driver-class-name: com.mysql.cj.jdbc.Driver
url: jdbc:mysql://localhost:3306/test?serverTimezone=Asia/Shanghai&allowMultiQueries=true
username: root
password: 1234
mybatis-plus:
mapper-locations: classpath*:/mapper/*.xml
typeAliasesPackage: com.banmoon.security.entity
global-config:
db-config:
id-type: AUTO
configuration:
map-underscore-to-camel-case: true
cache-enabled: false
call-setters-on-nulls: true
jdbc-type-for-null: 'null'
|
如此一来,先添加数据库表,简单一个用户表,以及其对应的角色表
1
2
3
4
5
6
7
8
9
10
11
12
13
14
15
16
17
18
| CREATE TABLE `sys_user` (
`id` int(11) NOT NULL AUTO_INCREMENT,
`username` varchar(32) NOT NULL COMMENT '用户名',
`password` varchar(128) NOT NULL COMMENT '密码',
PRIMARY KEY (`id`)
) ENGINE=InnoDB AUTO_INCREMENT=3 DEFAULT CHARSET=utf8mb4;
CREATE TABLE `sys_user_role` (
`id` int(11) NOT NULL AUTO_INCREMENT,
`user_id` int(11) NOT NULL COMMENT '用户ID',
`role` varchar(128) DEFAULT NULL COMMENT '角色',
PRIMARY KEY (`id`)
) ENGINE=InnoDB AUTO_INCREMENT=3 DEFAULT CHARSET=utf8mb4;
INSERT INTO `sys_user`(`id`, `username`, `password`) VALUES (1, 'banmoon', '1234');
INSERT INTO `sys_user`(`id`, `username`, `password`) VALUES (2, 'user', '1234');
INSERT INTO `sys_user_role`(`id`, `user_id`, `role`) VALUES (1, 1, 'admin');
INSERT INTO `sys_user_role`(`id`, `user_id`, `role`) VALUES (2, 2, 'user');
|
表创建完毕,编写他们对应的实体类和Mapper,代码生成器启动,这些东西就不要手写了,麻烦
1
2
3
4
5
6
7
8
9
10
11
12
13
14
15
16
17
18
19
20
21
22
23
24
25
26
27
28
29
30
31
32
33
34
35
36
37
38
39
40
| package com.banmoon.security.entity;
import com.baomidou.mybatisplus.annotation.TableField;
import com.baomidou.mybatisplus.annotation.TableName;
import com.baomidou.mybatisplus.annotation.IdType;
import com.baomidou.mybatisplus.annotation.TableId;
import java.io.Serializable;
import java.util.List;
import lombok.Data;
import lombok.EqualsAndHashCode;
import lombok.experimental.Accessors;
@Data
@EqualsAndHashCode(callSuper = false)
@Accessors(chain = true)
@TableName("sys_user")
public class User implements Serializable {
private static final long serialVersionUID = 1L;
@TableId(value = "id", type = IdType.AUTO)
private Integer id;
@TableField("username")
private String username;
@TableField("password")
private String password;
@TableField(exist = false)
private List<UserRole> userRoleList;
}
|
1
2
3
4
5
6
7
8
9
10
11
12
13
14
15
16
17
18
19
20
21
22
23
24
25
26
27
28
29
30
31
32
33
34
35
36
| package com.banmoon.security.entity;
import com.baomidou.mybatisplus.annotation.TableField;
import com.baomidou.mybatisplus.annotation.TableName;
import com.baomidou.mybatisplus.annotation.IdType;
import com.baomidou.mybatisplus.annotation.TableId;
import java.io.Serializable;
import lombok.Data;
import lombok.EqualsAndHashCode;
import lombok.experimental.Accessors;
@Data
@EqualsAndHashCode(callSuper = false)
@Accessors(chain = true)
@TableName("sys_user_role")
public class UserRole implements Serializable {
private static final long serialVersionUID = 1L;
@TableId(value = "id", type = IdType.AUTO)
private Integer id;
@TableField("user_id")
private Integer userId;
@TableField("role")
private String role;
}
|
对应两个实体类的Mapper接口
1
2
3
4
5
6
7
8
| package com.banmoon.security.mapper;
import com.banmoon.security.entity.User;
import com.baomidou.mybatisplus.core.mapper.BaseMapper;
public interface UserMapper extends BaseMapper<User> {
}
|
1
2
3
4
5
6
7
8
| package com.banmoon.security.mapper;
import com.banmoon.security.entity.UserRole;
import com.baomidou.mybatisplus.core.mapper.BaseMapper;
public interface UserRoleMapper extends BaseMapper<UserRole> {
}
|
如此一来,我们就完成了准备工作,接下来才是正戏,首先我们需要写一个实现类来继承UserDetailsService.java,如下
1
2
3
4
5
6
7
8
9
10
11
12
13
14
15
16
17
18
19
20
21
22
23
24
25
26
27
28
29
30
31
32
33
34
35
36
37
| package com.banmoon.security.service;
import com.banmoon.security.bo.UserDetailBO;
import com.banmoon.security.entity.User;
import com.banmoon.security.entity.UserRole;
import com.banmoon.security.mapper.UserMapper;
import com.banmoon.security.mapper.UserRoleMapper;
import com.baomidou.mybatisplus.core.conditions.query.LambdaQueryWrapper;
import org.springframework.beans.factory.annotation.Autowired;
import org.springframework.security.core.userdetails.UserDetails;
import org.springframework.security.core.userdetails.UserDetailsService;
import org.springframework.security.core.userdetails.UsernameNotFoundException;
import org.springframework.stereotype.Service;
import java.util.List;
@Service
public class UserService implements UserDetailsService {
@Autowired
private UserMapper userMapper;
@Autowired
private UserRoleMapper userRoleMapper;
@Override
public UserDetails loadUserByUsername(String username) throws UsernameNotFoundException {
User user = userMapper.selectOne(new LambdaQueryWrapper<User>()
.eq(User::getUsername, username));
if(user==null)
throw new UsernameNotFoundException("用户不存在");
List<UserRole> userRoleList = userRoleMapper.selectList(new LambdaQueryWrapper<UserRole>()
.eq(UserRole::getUserId, user.getId()));
user.setUserRoleList(userRoleList);
return new UserDetailBO(user);
}
}
|
至于UserDetailBO.java,是UserDetails.java的一个实现类,和我们User.java实体呈现聚合关系
1
2
3
4
5
6
7
8
9
10
11
12
13
14
15
16
17
18
19
20
21
22
23
24
25
26
27
28
29
30
31
32
33
34
35
36
37
38
39
40
41
42
43
44
45
46
47
48
49
50
51
52
53
54
55
56
57
58
59
60
61
62
63
64
65
66
67
68
69
70
71
72
73
74
75
76
77
78
| package com.banmoon.security.bo;
import com.banmoon.security.entity.User;
import com.banmoon.security.entity.UserRole;
import org.springframework.security.core.GrantedAuthority;
import org.springframework.security.core.authority.SimpleGrantedAuthority;
import org.springframework.security.core.userdetails.UserDetails;
import java.util.Collection;
import java.util.List;
import java.util.stream.Collectors;
public class UserDetailBO implements UserDetails {
private User user;
public UserDetailBO(User user) {
this.user = user;
}
@Override
public Collection<? extends GrantedAuthority> getAuthorities() {
List<UserRole> list = user.getUserRoleList();
List<SimpleGrantedAuthority> authorityList = list.stream().map(a -> new SimpleGrantedAuthority(a.getRole()))
.collect(Collectors.toList());
return authorityList;
}
@Override
public String getPassword() {
return user.getPassword();
}
@Override
public String getUsername() {
return user.getUsername();
}
@Override
public boolean isAccountNonExpired() {
return true;
}
@Override
public boolean isAccountNonLocked() {
return true;
}
@Override
public boolean isCredentialsNonExpired() {
return true;
}
@Override
public boolean isEnabled() {
return true;
}
}
|
如此就完成了,自己对数据库的访问,自定义的添加及扩展,来看下效果
1
2
3
4
5
6
7
8
9
10
11
12
13
14
15
16
17
18
19
20
| package com.banmoon.security.controller;
import com.banmoon.security.bo.UserDetailBO;
import lombok.extern.slf4j.Slf4j;
import org.springframework.security.core.Authentication;
import org.springframework.security.core.context.SecurityContextHolder;
import org.springframework.security.core.userdetails.UserDetails;
import org.springframework.web.bind.annotation.GetMapping;
import org.springframework.web.bind.annotation.RestController;
@Slf4j
@RestController
public class TestController {
@GetMapping("/hello")
public String hello(){
return "半月无霜,spring security数据库连接之【自定义UserDetailsService】";
}
}
|

七、其它
1)密码加密
在上面的代码示例中,你们常常会看到我在配置类中定义了一个这样的bean
1
2
3
4
5
6
7
8
9
| @Configuration
public class SecurityConfig extends WebSecurityConfigurerAdapter {
@Bean
public PasswordEncoder passwordEncoder(){
return NoOpPasswordEncoder.getInstance();
}
}
|
这段配置,简单的说就是不启动密码加密。虽然此段代码不推荐,但目前处于学习阶段,大家在生产上不要使用就好。
这个bean是什么,大家肯定已经知道了。这就是配置加密算法的配置bean。配置完成后,SpringSecurity就能对传入的密码进行校验。
关于其他的密码加密,SpringSecurity官方推荐使用BCryptPasswordEncoder.java,当然也可以使用其他的。

如果上面加密都不满足你,也可以自己去实现PasswordEncoder.java接口,然后进行加密的配置。
2)自动踢掉前一个登录用户
在同一个系统中,可能会出现一个账号重复登录的问题,这时候我们有几种可能
-
默认:只要账号密码正确,允许一个账号多地登录,
-
后一个账号登录时,自动踢掉前一个登录账号
-
如果当前账号在线,后面的账号登录将失败
上面的这几种情况,SpringSecurity早就考虑到了,可以通过它的配置解决
2.1)踢掉已登录用户
1
2
3
4
5
6
7
8
9
10
11
12
13
14
| @Configuration
public class SecurityConfig extends WebSecurityConfigurerAdapter {
@Override
protected void configure(HttpSecurity http) throws Exception {
http.authorizeRequests()
.anyRequest().authenticated()
.and()
.sessionManagement()
.maximumSessions(1);
http.formLogin();
http.httpBasic();
}
}
|
自己可以进行测试下,可以使用不同的浏览器访问,登录同个账号来进行测试
2.2)禁止新的登录
如果当前的账号已在线,新的登录将会失败,那么我们可以这样进行配置
只需要设置maxSessionsPreventsLogin(true),再设置一个HttpSessionEventPublisher的bean即可
1
2
3
4
5
6
7
8
9
10
11
12
13
14
15
16
17
18
19
20
| @Configuration
public class SecurityConfig extends WebSecurityConfigurerAdapter {
@Bean
public HttpSessionEventPublisher httpSessionEventPublisher() {
return new HttpSessionEventPublisher();
}
@Override
protected void configure(HttpSecurity http) throws Exception {
http.authorizeRequests()
.anyRequest().authenticated()
.and()
.sessionManagement()
.maximumSessions(1)
.maxSessionsPreventsLogin(true);
http.formLogin();
http.httpBasic();
}
}
|
同样配置完后,由两个不同浏览器进行登录,进行测试
2.3)使用数据库用户,踢掉已登录用户时出现的问题
在SpringSecurity使用数据库用户的时候,还去使用单点登录,踢掉前一个登录这个功能,会有问题。
使用数据库登录这块的代码可以查看上面第六章:连接数据库,在此基础上,我们添加对应的配置方法maximumSessions()
1
2
3
4
5
6
7
8
9
10
11
12
13
14
15
16
17
18
19
20
| @Configuration
public class SecurityConfig extends WebSecurityConfigurerAdapter {
@Bean
public PasswordEncoder passwordEncoder(){
return NoOpPasswordEncoder.getInstance();
}
@Override
protected void configure(HttpSecurity http) throws Exception {
http.authorizeRequests()
.anyRequest().authenticated()
.and()
.sessionManagement()
.maximumSessions(1);
http.formLogin();
http.httpBasic();
}
}
|
如此再进行测试的话,发现了多个浏览器去登录同个账号,并没有踢掉前一个登录,这是怎么一回事?
要知道SpringSecurity登录靠的就是session,要想知道发生了什么,我们要进入SpringSecurity管理session的源码中。
SessionRegistryImpl.java就是做这个的,我们简单看看源码(截取)
1
2
3
4
5
6
7
8
9
10
11
12
13
14
15
16
17
18
19
20
21
22
23
24
25
26
27
28
29
30
31
32
33
34
35
36
37
38
39
40
41
42
43
44
45
46
47
48
49
50
51
52
53
54
55
56
57
58
59
60
61
62
63
64
65
66
67
68
69
| public class SessionRegistryImpl implements SessionRegistry, ApplicationListener<AbstractSessionEvent> {
private final ConcurrentMap<Object, Set<String>> principals;
private final Map<String, SessionInformation> sessionIds;
public SessionRegistryImpl() {
this.principals = new ConcurrentHashMap<>();
this.sessionIds = new ConcurrentHashMap<>();
}
@Override
public void registerNewSession(String sessionId, Object principal) {
Assert.hasText(sessionId, "SessionId required as per interface contract");
Assert.notNull(principal, "Principal required as per interface contract");
if (getSessionInformation(sessionId) != null) {
removeSessionInformation(sessionId);
}
if (this.logger.isDebugEnabled()) {
this.logger.debug(LogMessage.format("Registering session %s, for principal %s", sessionId, principal));
}
this.sessionIds.put(sessionId, new SessionInformation(principal, sessionId, new Date()));
this.principals.compute(principal, (key, sessionsUsedByPrincipal) -> {
if (sessionsUsedByPrincipal == null) {
sessionsUsedByPrincipal = new CopyOnWriteArraySet<>();
}
sessionsUsedByPrincipal.add(sessionId);
this.logger.trace(LogMessage.format("Sessions used by '%s' : %s", principal, sessionsUsedByPrincipal));
return sessionsUsedByPrincipal;
});
}
@Override
public void removeSessionInformation(String sessionId) {
Assert.hasText(sessionId, "SessionId required as per interface contract");
SessionInformation info = getSessionInformation(sessionId);
if (info == null) {
return;
}
if (this.logger.isTraceEnabled()) {
this.logger.debug("Removing session " + sessionId + " from set of registered sessions");
}
this.sessionIds.remove(sessionId);
this.principals.computeIfPresent(info.getPrincipal(), (key, sessionsUsedByPrincipal) -> {
this.logger.debug(
LogMessage.format("Removing session %s from principal's set of registered sessions", sessionId));
sessionsUsedByPrincipal.remove(sessionId);
if (sessionsUsedByPrincipal.isEmpty()) {
this.logger.debug(LogMessage.format("Removing principal %s from registry", info.getPrincipal()));
sessionsUsedByPrincipal = null;
}
this.logger.trace(
LogMessage.format("Sessions used by '%s' : %s", info.getPrincipal(), sessionsUsedByPrincipal));
return sessionsUsedByPrincipal;
});
}
}
|
这新增和移除session写的明明白白的呀,怎么回事?
不急,先看看他们使用什么进行管理session的,是Map容器,他们根据对应的key来判断冲突。所以我们只需要查看Object principal是什么就好。
怎么看Object principal是什么,打个断点debug一下

熟悉吗?这个是我们自己设置的用户详情类UserDetailBO.java。
所以这里结合Map容器就有了一个坑,那就是在使用对象作为Map容器的key时,记得要重写他们的equal()和hashCode()这两个方法。至于为什么,这是Map容器中的知识。。。
所以我们重写这个类的equal()和hashCode(),其他方法代码省略…
1
2
3
4
5
6
7
8
9
10
11
12
13
14
15
16
17
18
19
20
21
| public class UserDetailBO implements UserDetails {
private User user;
public UserDetailBO(User user) {
this.user = user;
}
@Override
public boolean equals(Object o) {
if (this == o) return true;
if (o == null || getClass() != o.getClass()) return false;
UserDetailBO that = (UserDetailBO) o;
return Objects.equals(user.getUsername(), that.user.getUsername());
}
@Override
public int hashCode() {
return Objects.hash(user.getUsername());
}
}
|
3)获取当前登录用户的信息
在web开发中,我们肯定要去获取当前请求接口的用户信息的,那么我们该如何去获取呢?
直接点,上代码
1
2
3
4
5
6
7
8
9
10
11
12
13
14
15
16
17
18
19
20
21
22
23
24
25
26
27
28
29
30
| package com.banmoon.security.controller;
import com.banmoon.security.bo.UserDetailBO;
import lombok.extern.slf4j.Slf4j;
import org.springframework.security.core.Authentication;
import org.springframework.security.core.context.SecurityContextHolder;
import org.springframework.security.core.userdetails.UserDetails;
import org.springframework.web.bind.annotation.GetMapping;
import org.springframework.web.bind.annotation.RestController;
@Slf4j
@RestController
public class TestController {
@GetMapping("/hello")
public String hello(){
Authentication authentication = SecurityContextHolder.getContext().getAuthentication();
String name = authentication.getName();
return "其他功能,获取当前登录用户:" + name;
}
@GetMapping("/username")
public String username(){
Authentication authentication = SecurityContextHolder.getContext().getAuthentication();
UserDetailBO bo = (UserDetailBO) authentication.getPrincipal();
log.info("用户信息:{}", bo);
return bo.getUsername();
}
}
|
当我们访问/hello和/username时,将会获取到当前的用户名


八、动态配置权限
在项目中,我们又该如何去使用这些功能呢。下面将会给出一种方法,也是我喜欢的一种写法,仅供参考。
不好说是不是标准的**RBAC(Role-Based Access Control)**权限模型,但八九也不离十了
给用户分配角色,给角色分配资源(权限),分配到角色的用户可以访问这些资源。
往往这些用户,角色,资源的配置都是动态的,这样我们又该如何去进行配置呢?
1)数据库建表
建表语句如下,
1
2
3
4
5
6
7
8
9
10
11
12
13
14
15
16
17
18
19
20
21
22
23
24
25
26
27
28
29
30
31
32
33
34
35
36
37
38
39
40
41
42
43
44
45
46
47
48
49
50
51
52
| CREATE TABLE `sys_user` (
`id` int(11) NOT NULL AUTO_INCREMENT,
`username` varchar(32) NOT NULL COMMENT '用户名',
`password` varchar(128) NOT NULL COMMENT '密码',
PRIMARY KEY (`id`)
) ENGINE=InnoDB AUTO_INCREMENT=3 DEFAULT CHARSET=utf8mb4 COMMENT='用户表';
CREATE TABLE `sys_user_role` (
`id` int(11) NOT NULL AUTO_INCREMENT,
`user_id` int(11) NOT NULL COMMENT '用户ID',
`role_id` int(11) NOT NULL COMMENT '角色ID',
PRIMARY KEY (`id`),
UNIQUE KEY `unique_user_role` (`user_id`,`role_id`) USING BTREE
) ENGINE=InnoDB DEFAULT CHARSET=utf8mb4 COMMENT='用户角色表';
CREATE TABLE `sys_role` (
`id` int(11) NOT NULL AUTO_INCREMENT,
`name` varchar(20) DEFAULT NULL COMMENT '角色名称',
PRIMARY KEY (`id`)
) ENGINE=InnoDB DEFAULT CHARSET=utf8mb4 COMMENT='角色表';
CREATE TABLE `sys_role_permission` (
`id` int(11) NOT NULL AUTO_INCREMENT,
`role_id` int(11) NOT NULL COMMENT '角色ID',
`permission_id` int(11) NOT NULL COMMENT '权限ID',
PRIMARY KEY (`id`),
KEY `unique_role_permission` (`role_id`,`permission_id`) USING BTREE
) ENGINE=InnoDB DEFAULT CHARSET=utf8mb4 COMMENT='角色权限表';
CREATE TABLE `sys_permission` (
`id` int(11) NOT NULL AUTO_INCREMENT,
`menu_id` int(11) DEFAULT NULL,
`name` varchar(20) DEFAULT NULL COMMENT '权限名称',
`description` varchar(200) DEFAULT NULL COMMENT '权限说明',
`url` varchar(50) DEFAULT NULL COMMENT '权限请求url',
PRIMARY KEY (`id`)
) ENGINE=InnoDB AUTO_INCREMENT=6 DEFAULT CHARSET=utf8mb4 COMMENT='权限表';
CREATE TABLE `sys_role_menu` (
`id` int(11) NOT NULL,
`role_id` int(11) NOT NULL COMMENT '角色ID',
`menu_id` int(11) NOT NULL COMMENT '菜单ID',
PRIMARY KEY (`id`),
UNIQUE KEY `unique_role_menu` (`role_id`,`menu_id`) USING BTREE
) ENGINE=InnoDB DEFAULT CHARSET=utf8mb4 COMMENT='角色菜单表';
CREATE TABLE `sys_menu` (
`id` int(11) NOT NULL,
`parent_id` int(11) DEFAULT NULL COMMENT '父级菜单ID',
`name` varchar(20) DEFAULT NULL COMMENT '菜单名称',
PRIMARY KEY (`id`)
) ENGINE=InnoDB DEFAULT CHARSET=utf8mb4 COMMENT='菜单表';
|
2)配置
注意,此处配置时前后端不分离的配置模式,大家可以根据自己的需求,改成前后端分离的模式。
2.1)maven和配置文件
maven依赖和配置文件和上述的自定义实现类基本一致,就是多了一个redis,
还有其他工具包,就不放出来了
1
2
3
4
5
6
7
8
9
10
11
12
13
14
15
16
17
18
19
20
21
22
23
24
25
26
27
28
29
30
| <dependencies>
<dependency>
<groupId>org.springframework.boot</groupId>
<artifactId>spring-boot-starter-data-redis</artifactId>
</dependency>
<dependency>
<groupId>mysql</groupId>
<artifactId>mysql-connector-java</artifactId>
<scope>runtime</scope>
</dependency>
<dependency>
<groupId>com.baomidou</groupId>
<artifactId>mybatis-plus-boot-starter</artifactId>
<version>3.5.1</version>
</dependency>
<dependency>
<groupId>org.projectlombok</groupId>
<artifactId>lombok</artifactId>
</dependency>
<dependency>
<groupId>junit</groupId>
<artifactId>junit</artifactId>
<scope>test</scope>
</dependency>
</dependencies>
|
1
2
3
4
5
6
7
8
9
10
11
12
13
14
15
16
17
18
19
20
21
22
| spring:
datasource:
driver-class-name: com.mysql.cj.jdbc.Driver
url: jdbc:mysql://localhost:3306/test?serverTimezone=Asia/Shanghai&allowMultiQueries=true
username: root
password: 1234
redis:
host: localhost
port: 6379
mybatis-plus:
mapper-locations: classpath*:/mapper/*.xml
typeAliasesPackage: com.banmoon.security.entity
global-config:
db-config:
id-type: AUTO
configuration:
map-underscore-to-camel-case: true
cache-enabled: false
call-setters-on-nulls: true
jdbc-type-for-null: 'null'
|
2.2)实体和Mapper
这些你都要手写吗?抓紧去看代码生成器,网上也是一抓一大把。
这边简单放一个User.java的,剩余的你们自己生成
1
2
3
4
5
6
7
8
9
10
11
12
13
14
15
16
17
18
19
20
21
22
23
24
25
26
27
28
29
30
31
32
33
34
35
36
37
38
39
40
41
| package com.banmoon.test.entity;
import com.baomidou.mybatisplus.annotation.TableName;
import com.baomidou.mybatisplus.annotation.IdType;
import com.baomidou.mybatisplus.annotation.TableId;
import java.io.Serializable;
import lombok.Data;
import lombok.EqualsAndHashCode;
import lombok.experimental.Accessors;
@Data
@EqualsAndHashCode(callSuper = false)
@Accessors(chain = true)
@TableName("sys_user")
public class User implements Serializable {
private static final long serialVersionUID = 1L;
@TableId(value = "id", type = IdType.AUTO)
private Integer id;
private String username;
private String password;
}
|
1
2
3
4
5
6
7
8
9
10
11
12
13
14
15
16
| package com.banmoon.test.mapper;
import com.banmoon.test.entity.User;
import com.baomidou.mybatisplus.core.mapper.BaseMapper;
public interface UserMapper extends BaseMapper<User> {
}
|
1
2
3
4
5
6
7
8
9
10
11
12
| <?xml version="1.0" encoding="UTF-8"?>
<!DOCTYPE mapper PUBLIC "-//mybatis.org//DTD Mapper 3.0//EN" "http://mybatis.org/dtd/mybatis-3-mapper.dtd">
<mapper namespace="com.banmoon.test.mapper.UserMapper">
<resultMap id="BaseResultMap" type="com.banmoon.test.entity.User">
<id column="id" property="id" />
<result column="username" property="username" />
<result column="password" property="password" />
</resultMap>
</mapper>
|
2.3)SpringSecurity配置
终于到了SpringSecurity配置,这一块其实在上面讲过一些了。
1
2
3
4
5
6
7
8
9
10
11
12
13
14
15
16
17
18
19
20
21
22
23
24
25
26
27
28
29
30
31
32
33
34
35
36
37
38
39
40
41
42
43
44
45
46
47
48
49
50
51
52
53
54
55
56
57
58
59
60
61
62
63
64
65
66
67
68
69
70
71
| package com.banmoon.security.config;
import com.banmoon.security.handler.AccessDecisionManagerHandler;
import com.banmoon.security.handler.MyObjectPostProcessor;
import com.banmoon.security.handler.MySecurityMetadataSource;
import com.banmoon.security.service.impl.UserServiceImpl;
import org.springframework.beans.factory.annotation.Autowired;
import org.springframework.context.annotation.Bean;
import org.springframework.context.annotation.Configuration;
import org.springframework.security.config.annotation.authentication.builders.AuthenticationManagerBuilder;
import org.springframework.security.config.annotation.web.builders.HttpSecurity;
import org.springframework.security.config.annotation.web.builders.WebSecurity;
import org.springframework.security.config.annotation.web.configuration.EnableWebSecurity;
import org.springframework.security.config.annotation.web.configuration.WebSecurityConfigurerAdapter;
import org.springframework.security.crypto.password.NoOpPasswordEncoder;
import org.springframework.security.crypto.password.PasswordEncoder;
@Configuration
@EnableWebSecurity
public class SecurityConfig extends WebSecurityConfigurerAdapter {
@Autowired
private MySecurityMetadataSource mySecurityMetadataSource;
@Autowired
private UserServiceImpl userService;
@Bean
public PasswordEncoder passwordEncoder(){
return NoOpPasswordEncoder.getInstance();
}
@Override
protected void configure(AuthenticationManagerBuilder auth) throws Exception {
auth.userDetailsService(userService);
}
@Override
public void configure(WebSecurity web) throws Exception {
super.configure(web);
}
@Override
protected void configure(HttpSecurity http) throws Exception {
http.authorizeRequests()
.withObjectPostProcessor(new MyObjectPostProcessor(mySecurityMetadataSource, new AccessDecisionManagerHandler()))
.anyRequest().permitAll();
http.formLogin()
.defaultSuccessUrl("/hello/hello")
.and()
.csrf()
.disable();
}
}
|
MyObjectPostProcessor.java,简单的说就是为FilterSecurityInterceptor实例设置两个自定义的处理
1
2
3
4
5
6
7
8
9
10
11
12
13
14
15
16
17
18
19
20
21
22
23
24
25
| package com.banmoon.security.handler;
import org.springframework.security.access.AccessDecisionManager;
import org.springframework.security.config.annotation.ObjectPostProcessor;
import org.springframework.security.web.access.intercept.FilterInvocationSecurityMetadataSource;
import org.springframework.security.web.access.intercept.FilterSecurityInterceptor;
public class MyObjectPostProcessor implements ObjectPostProcessor<FilterSecurityInterceptor> {
private final FilterInvocationSecurityMetadataSource metadataSource;
private final AccessDecisionManager accessDecisionManager;
public MyObjectPostProcessor(FilterInvocationSecurityMetadataSource metadataSource, AccessDecisionManager accessDecisionManager) {
this.metadataSource = metadataSource;
this.accessDecisionManager = accessDecisionManager;
}
@Override
public <O extends FilterSecurityInterceptor> O postProcess(O fsi) {
fsi.setSecurityMetadataSource(metadataSource);
fsi.setAccessDecisionManager(accessDecisionManager);
return fsi;
}
}
|
MySecurityMetadataSource.java,找到访问当前资源需要什么权限
1
2
3
4
5
6
7
8
9
10
11
12
13
14
15
16
17
18
19
20
21
22
23
24
25
26
27
28
29
30
31
32
33
34
35
36
37
38
39
40
41
42
43
44
45
46
47
48
49
50
51
52
53
54
55
56
57
| package com.banmoon.security.handler;
import com.banmoon.security.entity.Permission;
import com.banmoon.security.entity.Role;
import com.banmoon.security.service.IPermissionService;
import com.banmoon.security.service.IRoleService;
import org.springframework.beans.factory.annotation.Autowired;
import org.springframework.security.access.ConfigAttribute;
import org.springframework.security.access.SecurityConfig;
import org.springframework.security.web.FilterInvocation;
import org.springframework.security.web.access.intercept.FilterInvocationSecurityMetadataSource;
import org.springframework.stereotype.Component;
import org.springframework.util.AntPathMatcher;
import java.util.Collection;
import java.util.List;
@Component
public class MySecurityMetadataSource implements FilterInvocationSecurityMetadataSource {
@Autowired
private IPermissionService permissionService;
@Autowired
private IRoleService roleService;
@Override
public Collection<ConfigAttribute> getAttributes(Object object) throws IllegalArgumentException {
AntPathMatcher antPathMatcher = new AntPathMatcher();
String requestURI = ((FilterInvocation) object).getRequest().getRequestURI();
List<Permission> permissionList = permissionService.list();
for (Permission permission : permissionList) {
if (antPathMatcher.match(permission.getUrl(), requestURI)) {
List<Role> roleList = roleService.queryListByPermissionId(permission.getId());
String[] roles = roleList.stream()
.map(Role::getName)
.toArray(String[]::new);
return SecurityConfig.createList(roles);
}
}
return null;
}
@Override
public Collection<ConfigAttribute> getAllConfigAttributes() {
return null;
}
@Override
public boolean supports(Class<?> clazz) {
return FilterInvocation.class.isAssignableFrom(clazz);
}
}
|
AccessDecisionManagerHandler.java,主要将可以访问此资源的权限集合,和用户拥有的权限进行对比
1
2
3
4
5
6
7
8
9
10
11
12
13
14
15
16
17
18
19
20
21
22
23
24
25
26
27
28
29
30
31
32
33
34
35
36
37
38
39
40
41
42
43
44
| package com.banmoon.security.handler;
import org.springframework.security.access.AccessDecisionManager;
import org.springframework.security.access.AccessDeniedException;
import org.springframework.security.access.ConfigAttribute;
import org.springframework.security.authentication.InsufficientAuthenticationException;
import org.springframework.security.core.Authentication;
import org.springframework.security.core.GrantedAuthority;
import java.util.Collection;
import java.util.List;
import java.util.stream.Collectors;
public class AccessDecisionManagerHandler implements AccessDecisionManager {
@Override
public void decide(Authentication authentication, Object object, Collection<ConfigAttribute> configAttributes) throws AccessDeniedException, InsufficientAuthenticationException {
List<String> permissionList = authentication.getAuthorities()
.stream()
.map(GrantedAuthority::getAuthority)
.collect(Collectors.toList());
for (ConfigAttribute item : configAttributes) {
if (permissionList.contains(item.getAttribute())) {
return;
}
}
throw new AccessDeniedException("没有操作权限");
}
@Override
public boolean supports(ConfigAttribute attribute) {
return true;
}
@Override
public boolean supports(Class<?> clazz) {
return true;
}
}
|
主要就是上面这两个了,即可实现动态权限的配置。
还有一些基本的没有列出来,比如UserDetailsService.java的实现类,UserDetails.java的实现类。在以前的章节都讲过,此处就不再赘述了
九、最后
我是半月,你我一同共勉!
